PLEASE NOTE: This tutorial uses FALCON 4 references and images. These minimums are still applicable for DCS. This is a summarized-public version of our procedure. Please join our official aircrew roster in order to gain full access to the v303rd FG SOP/Doctrine!
LANDING THE F-16C
When approaching the runway and within a few miles distance, lower your brake and get your speed below 250 kts. Lower your gear when it is safe to do so.
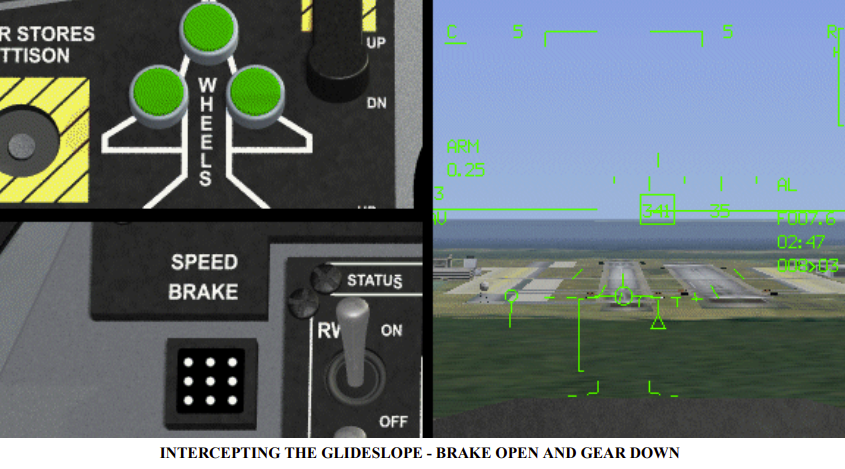
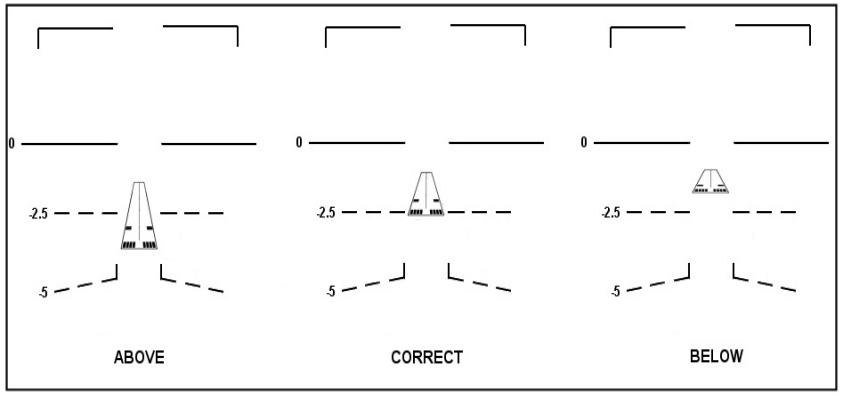
You will want your glideslope to be 2.5 to 3 degrees. If the front of the runway lies in the middle of the 0 and -5 degree pitch ladder on the HUD then you will know that your glideslope is correct. A dotted line can be seen in between the 0 and -5 pitch ladder. This 2.5 degree line can help you make sure you are on the glideslope. If you are above the glideslope then the runway threshold will be below the dotted 2.5 degree pitch line. If you are below the glideslope then the runway threshold will be above the 2.5 pitch line.
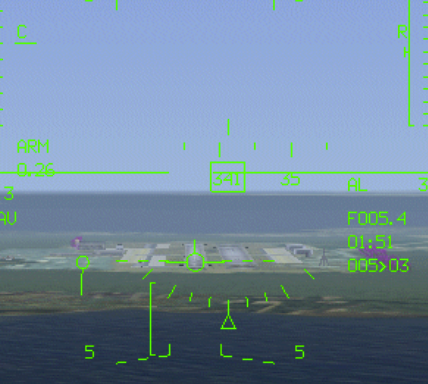
Once you are on the proper glideslope, place your FPM on the front of the runway using the control stick. This event can be seen in the image below:
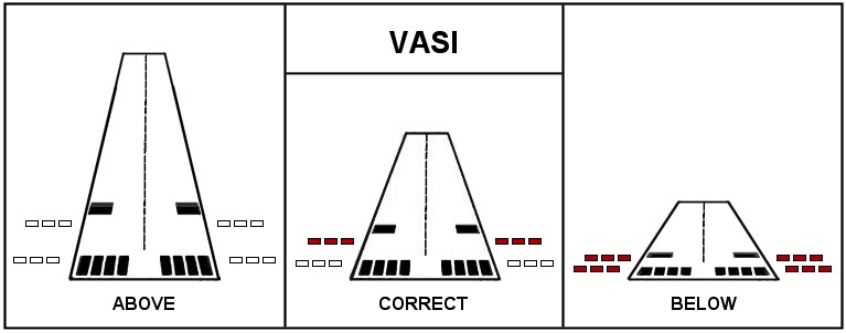
There is another way to know whether you are on the glideslope or not. You can use the VASI lights which are located at the front of the runway. On each side of the runway you will see two sets of lights. One set sits in front of the other. If both sets of lights are "white" then you are too high. You need to lower your altitude and get back onto the glideslope. When you are on the glideslope the far set of lights will be red and the close set will be white. If you are low then both sets of lights will be red. You will need to gain altitude to get back onto the glideslope. Here is an image illustrating this:
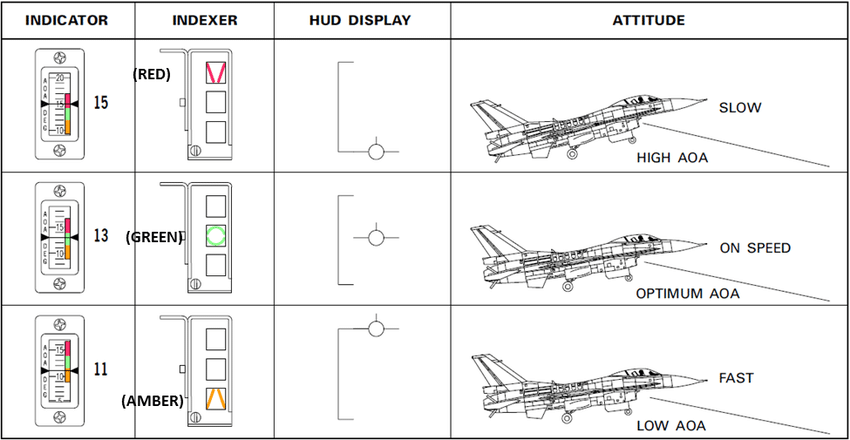
There is now a third thing we need to do. We need to get the FPM to the top of the AOA bracket. We can control our angle of attack using the throttle. If the FPM is above the AOA bracket then you will need to reduce power so that your AOA increases. I will usually drop the throttle completely to idle. Remember to keep the FPM on the front of the runway while you increase your AOA. With your throttle at idle the separation will happen quickly. In the image above the FPM would meet the top of the bracket on idle in about 10-15 seconds. Once you have gotten the FPM near to the top of the AOA bracket you will need to increase your power to keep the FPM at the top of the bracket. Usually a setting of 6000 fuel flow for light aircraft or 6500 fuel flow for heavy will keep you on the top of the bracket with no real problems.
The image below is probably the most important image in this tutorial. It shows an F-16 properly aligned for landing:
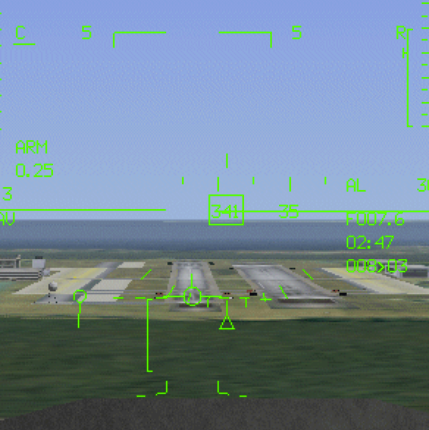
You will notice that all three conditions are now met:
1. We are on the glideslope. The dotted 2.5 degree ladder is at the front of the runway. 2. The FPM is at the front of the runway.
3. The FPM is lined up with the top of the AOA bracket. In other words, the front of the runway, the 2.5 pitch ladder, the FPM, and the top of the AOA bracket are all lined up with each other. Now all you need to do is hold it there! Below are four images showing glideslope alignment problems and their solutions. They are basic and pretty understandable.
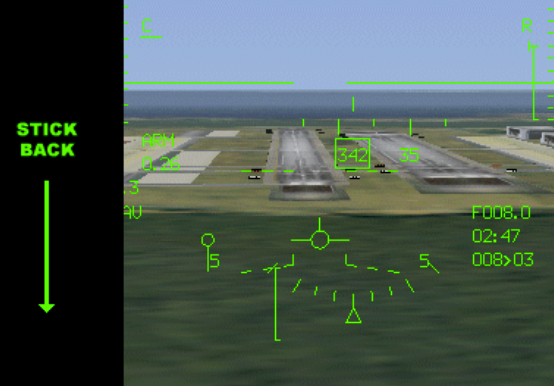
In this first image the FPM is below the runway threshold. All you simply need to do is pull back on the stick to get yourself back on the runway. Make sure you are still on the glideslope:
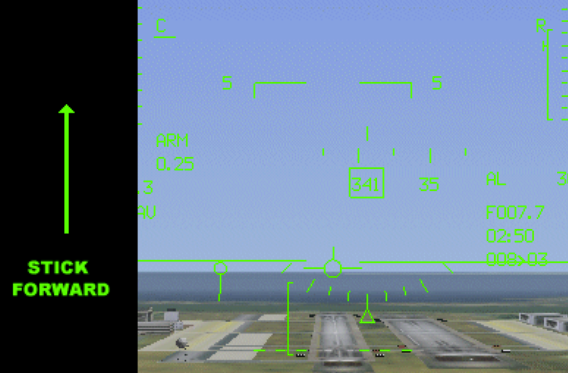
This next image shows the FPM too high in relation to the runway. Answer? You guessed it: Stick forward.
This next image shows the AOA too low (the FPM is above the bracket). Decrease power slightly to get your AOA up.
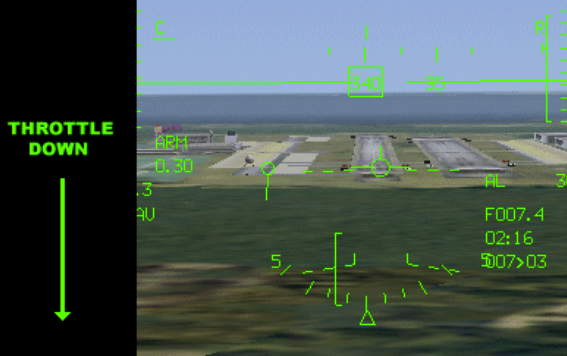
This last image shows the FPM deep in the AOA bracket. In this image the FPM isn't in a really bad position but you might want to think about adding a touch of power if it drops any more.
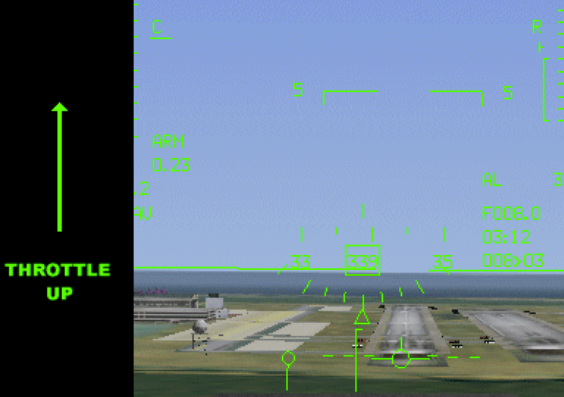
Keeping the FPM at the top of the AOA bracket is not difficult. It does require a bit of finesse though. Only small amounts of throttle change will be required to keep the FPM where it should be.
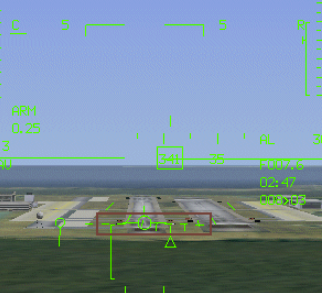
Here is that important image again showing an optimal glideslope approach with all three conditions met. It is different in that I have placed a red box around that area of the screen showing what you will want to look at clear up until the point where you flare. You can basically ignore looking at airspeed, altitude, fuel flow, the AOA light, etc. Still, there is certainly no problem with looking around the cockpit occasionally. I personally have a habit of taking glances at the fuel flow but that is just me. The great thing about using the FPM and AOA bracket almost exclusively for landing is that airspeed magically takes care of itself and you can keep your eyes on a small area of the HUD at almost all times. This helps decrease the workload while keeping SA high.
Now within seconds of landing and I gently flare a little by pulling back on the stick. This causes the FPM to move down the length of the runway. The flare for the F-16 is very small. You do not need much of a flare at all since you will only be transitioning from 11 degrees to the optimal AOA of 13 degrees. Also decrease power as you pull back and let the aircraft settle those last few feet to the runway.
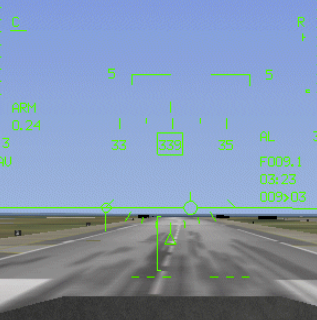
Touchdown! This next image shows me at about 12-13 degrees AOA. At this AOA you will not have to worry about bouncing back into the air. Your aircraft will "stick" to the ground:
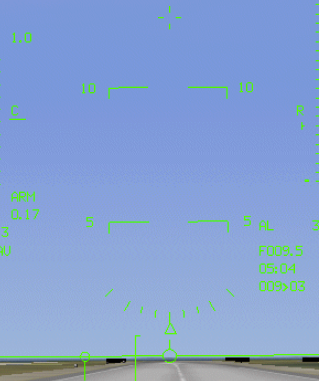
Be careful with the flare. Sometimes it is easy to flare too much and find yourself floating above the runway without settling. Cutting the power helps a lot. Try a few different flare techniques and see what works for you. Be careful with these landings though. It is very easy to flare too much and find yourself at touchdown at 15 degrees AOA.
Once you get good at landing this way you will be able to drop your tires to the pavement at the correct AOA, speed, and location on the runway. To summarize landing:
1. Get your airspeed down and your airbrake open and gear down.
2. Get yourself onto the glideslope (2.5-3 degrees).
3. Keep the FPM on the front of the runway (stick) and the FPM at the top of the AOA bracket (11 degrees AOA) (throttle).
4. When just a few seconds from landing do a small flare and cut power to idle. You may want your flare to be even smaller if you decide to cut your power at the moment your wheels make contact with the ground. Aerobrake on the ground by holding the gun cross above 10+ degrees.
Even if it doesn't it gives you a feel for an alternative approach to landing that is very similar to the type of landing done by F-16 pilots. Remember not to get discouraged if you have problems trying to land this way. Like all things it takes practice.
FINAL NOTE ON FLARING: The approach mentioned above is the one outlined by Pete Bonanni in the F4.0 manual. So long as you hold the 11 AOA approach to the threshold and then run the FPM down the runway you will do well. Just remember to pull back on the throttle during those final seconds and let the aircraft settle to the runway.
FLAMEOUT LANDINGS
Flameout landings really aren't that difficult. This section of the tutorial will try to teach you some basics in learning how to do them successfully. The first thing you should do when a flameout occurs is to jettison your stores. Jettison all of it as soon as you can. One thing that makes this type of landing different from the normal type of landing is that you will want your glideslope angle to be 11-12 degrees as opposed to 2.5-3 and your AOA to be 6 degrees instead of 11.
The high glideslope and low AOA are necessary to get you to the runway without losing all your energy and crashing short of the field. This first image shows me intercepting the glideslope. I have placed the FPM on the front of the runway. Do not lower your gear or open your speedbrake yet! it is much better intercepting the glideslope at 11-12 degrees.
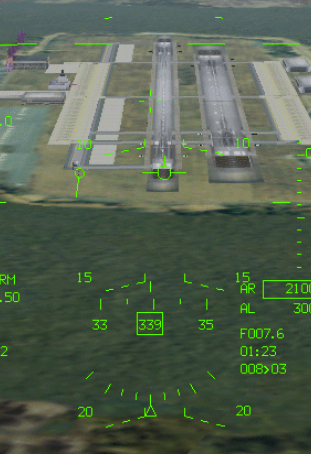
Two important conditions have now been met in the above image:
1. We are now on the 11 degree glideslope (the FPM is just below the 10 degree pitch ladder line).
2. The FPM has been placed on the front of the runway. Now we need to do a third thing. We need to get our AOA to 6 degrees. For our regular landings we were able to get to our 11 degree AOA by using the AOA bracket. For our flameout landing we will not have an AOA bracket to work with since we have not lowered our gear. We do not need the bracket though. We can visually tell what AOA we are at by looking at the difference between the FPM and the gun cross. The image above shows us at about 4 degrees AOA. You will notice that the distance between the FPM and the gun cross is only 4/5 the distance from the 5 and 10 degree pitch ladder lines.
So if our AOA is low, how do we increase it? We need to decrease or speed. We can do this by opening up the speedbrake. We simply need to open it until we reach 6 degrees. At that point we can close them again. If the AOA is too high then we will need to make sure the speedbrakes are closed so that the AOA can decrease. You will notice that I have not talked about airspeed. As long as your stores have been jettisoned, you are on a glideslope of 11 degrees, and your AOA is at 6 degrees, you will be at 210 kts airspeed which is exactly where you want to be. I do occasionally take a glance at the airspeed but you generally will not need to. Like in the first section of the tutorial there is no airspeed showing in any of my screenshots. It isn't necessary to place too much of an emphasis on it.
This next image is the most important image in the flameout tutorial. It shows exactly what you should see for an approach that is at a proper 11 degree glideslope and an AOA of 6 degrees:
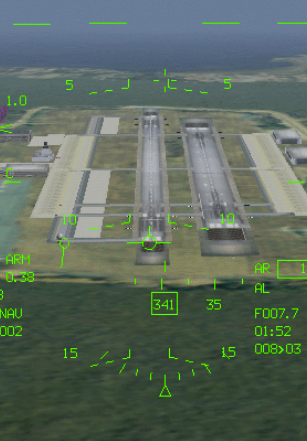
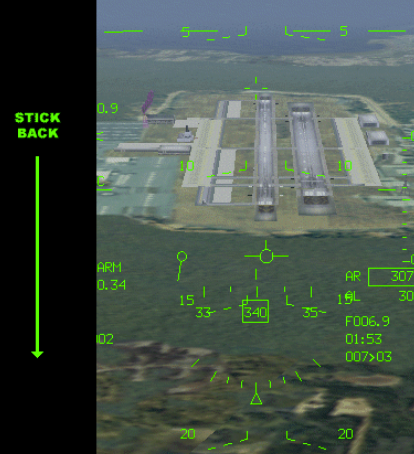
The next four images show solutions to various approach problems. This first image shows the FPM below the front of the runway. The solution is very simple. Pull back on the stick to get that FPM to the runway threshold.
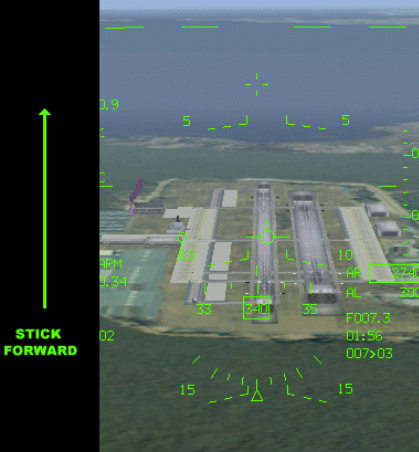
This second image shows the FPM too high. Push forward on the stick.
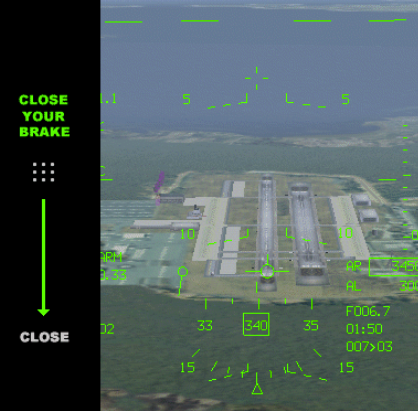
This next image shows the AOA too high. We are going too slow. If our brake is open we will need to close it to get our speed back up and our AOA lowered. This image shows our AOA at about 7 degrees. Remember that we want 6 degrees.
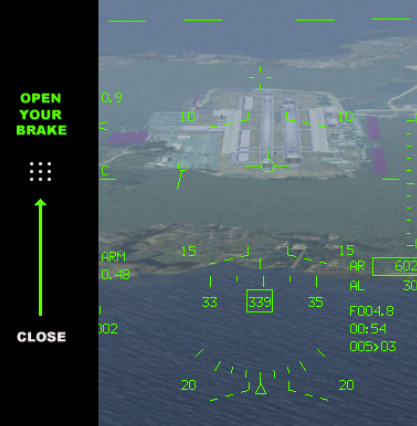
This final image shows the reverse situation. Our AOA is too low because our speed is too high. Open your speed brake. This will create drag slowing you down and raising the AOA.
You will notice that the big difference between a flameout landing and a regular landing is that we use the throttle to control our AOA in a regular landing and the brake to control our AOA in a flameout landing. Anyway, on with the tutorial: Usually, once 2000 feet from the ground, make sure brake is closed and then lower gear. This next image shows just before lowering the gear. At this point still doing everything right for a proper landing (11-12 degree glideslope and 5-6 degree AOA).
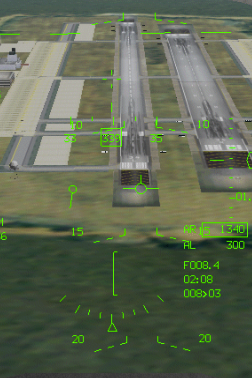
At about 500-300 feet (the altitude in the image above) we will start flaring. Now you may be wondering why we are starting to flare 500 feet above the ground. With our normal landing we flared about 100 feet above the ground.
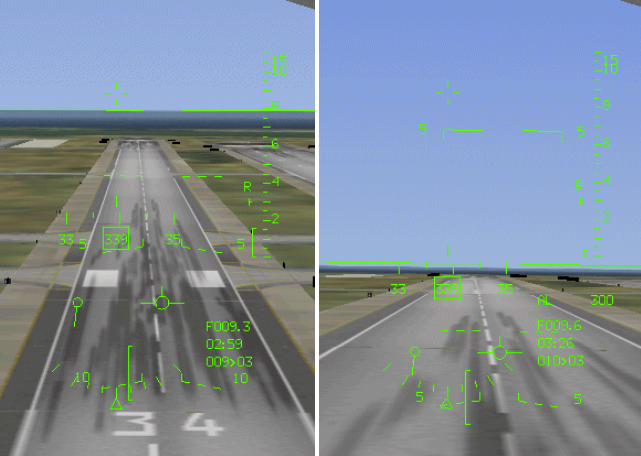
FPM will usually float near the end of the runway for about 3-5 seconds before touchdown. Sometimes, if my AOA seems low (about 6 degrees) place the FPM on the horizon and float a few feet above the ground for a few seconds allowing AOA to increase. The final image actually shows touchdown. AOA is near 10 degrees. Do not worry too much if your AOA is a little lower. You will also notice that you will land further down the runway than usual. This is normal for a flameout landing. Don't go too far though if you can help it.
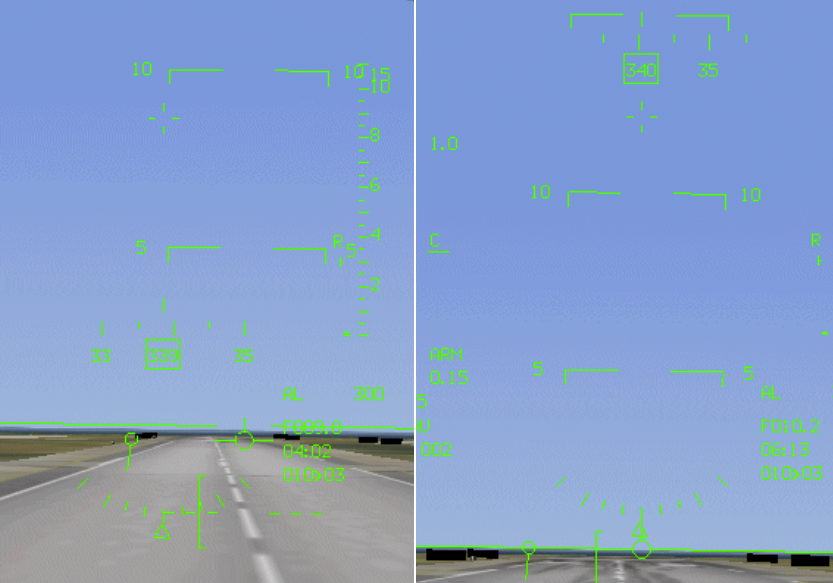
Upon touchdown you will want to extend the speed brake to help slow you down. Increase your AOA above 10 degrees to help aerobrake you. That's it.
Here is a recap of flameout landing procedure:
1. Jettison your stores!
2. Intercept the 11-17 degree glideslope.
3. Keep the FPM on the front of the runway (stick) and your AOA at 6 degrees (brake). 4. At 2000 feet close your brake (if open) and lower your gear. Ignore the brake from now on and fly the FPM.
5. Start flaring between 500-300 feet AGL. The flare will be gradual and needs to be timed so that the FPM is at the end of the runway when just short of touchdown.
6. Upon touchdown aerobrake by holding your nose at 10+ degrees and open your speedbrake.
LANDING THE F-16C
When approaching the runway and within a few miles distance, lower your brake and get your speed below 250 kts. Lower your gear when it is safe to do so.
You will want your glideslope to be 2.5 to 3 degrees. If the front of the runway lies in the middle of the 0 and -5 degree pitch ladder on the HUD then you will know that your glideslope is correct. A dotted line can be seen in between the 0 and -5 pitch ladder. This 2.5 degree line can help you make sure you are on the glideslope. If you are above the glideslope then the runway threshold will be below the dotted 2.5 degree pitch line. If you are below the glideslope then the runway threshold will be above the 2.5 pitch line.
Once you are on the proper glideslope, place your FPM on the front of the runway using the control stick. This event can be seen in the image below:
There is another way to know whether you are on the glideslope or not. You can use the VASI lights which are located at the front of the runway. On each side of the runway you will see two sets of lights. One set sits in front of the other. If both sets of lights are "white" then you are too high. You need to lower your altitude and get back onto the glideslope. When you are on the glideslope the far set of lights will be red and the close set will be white. If you are low then both sets of lights will be red. You will need to gain altitude to get back onto the glideslope. Here is an image illustrating this:
There is now a third thing we need to do. We need to get the FPM to the top of the AOA bracket. We can control our angle of attack using the throttle. If the FPM is above the AOA bracket then you will need to reduce power so that your AOA increases. I will usually drop the throttle completely to idle. Remember to keep the FPM on the front of the runway while you increase your AOA. With your throttle at idle the separation will happen quickly. In the image above the FPM would meet the top of the bracket on idle in about 10-15 seconds. Once you have gotten the FPM near to the top of the AOA bracket you will need to increase your power to keep the FPM at the top of the bracket. Usually a setting of 6000 fuel flow for light aircraft or 6500 fuel flow for heavy will keep you on the top of the bracket with no real problems.
The image below is probably the most important image in this tutorial. It shows an F-16 properly aligned for landing:
You will notice that all three conditions are now met:
1. We are on the glideslope. The dotted 2.5 degree ladder is at the front of the runway. 2. The FPM is at the front of the runway.
3. The FPM is lined up with the top of the AOA bracket. In other words, the front of the runway, the 2.5 pitch ladder, the FPM, and the top of the AOA bracket are all lined up with each other. Now all you need to do is hold it there! Below are four images showing glideslope alignment problems and their solutions. They are basic and pretty understandable.
In this first image the FPM is below the runway threshold. All you simply need to do is pull back on the stick to get yourself back on the runway. Make sure you are still on the glideslope:
This next image shows the FPM too high in relation to the runway. Answer? You guessed it: Stick forward.
This next image shows the AOA too low (the FPM is above the bracket). Decrease power slightly to get your AOA up.
This last image shows the FPM deep in the AOA bracket. In this image the FPM isn't in a really bad position but you might want to think about adding a touch of power if it drops any more.
Keeping the FPM at the top of the AOA bracket is not difficult. It does require a bit of finesse though. Only small amounts of throttle change will be required to keep the FPM where it should be.
Here is that important image again showing an optimal glideslope approach with all three conditions met. It is different in that I have placed a red box around that area of the screen showing what you will want to look at clear up until the point where you flare. You can basically ignore looking at airspeed, altitude, fuel flow, the AOA light, etc. Still, there is certainly no problem with looking around the cockpit occasionally. I personally have a habit of taking glances at the fuel flow but that is just me. The great thing about using the FPM and AOA bracket almost exclusively for landing is that airspeed magically takes care of itself and you can keep your eyes on a small area of the HUD at almost all times. This helps decrease the workload while keeping SA high.
Now within seconds of landing and I gently flare a little by pulling back on the stick. This causes the FPM to move down the length of the runway. The flare for the F-16 is very small. You do not need much of a flare at all since you will only be transitioning from 11 degrees to the optimal AOA of 13 degrees. Also decrease power as you pull back and let the aircraft settle those last few feet to the runway.
Touchdown! This next image shows me at about 12-13 degrees AOA. At this AOA you will not have to worry about bouncing back into the air. Your aircraft will "stick" to the ground:
Be careful with the flare. Sometimes it is easy to flare too much and find yourself floating above the runway without settling. Cutting the power helps a lot. Try a few different flare techniques and see what works for you. Be careful with these landings though. It is very easy to flare too much and find yourself at touchdown at 15 degrees AOA.
Once you get good at landing this way you will be able to drop your tires to the pavement at the correct AOA, speed, and location on the runway. To summarize landing:
1. Get your airspeed down and your airbrake open and gear down.
2. Get yourself onto the glideslope (2.5-3 degrees).
3. Keep the FPM on the front of the runway (stick) and the FPM at the top of the AOA bracket (11 degrees AOA) (throttle).
4. When just a few seconds from landing do a small flare and cut power to idle. You may want your flare to be even smaller if you decide to cut your power at the moment your wheels make contact with the ground. Aerobrake on the ground by holding the gun cross above 10+ degrees.
Even if it doesn't it gives you a feel for an alternative approach to landing that is very similar to the type of landing done by F-16 pilots. Remember not to get discouraged if you have problems trying to land this way. Like all things it takes practice.
FINAL NOTE ON FLARING: The approach mentioned above is the one outlined by Pete Bonanni in the F4.0 manual. So long as you hold the 11 AOA approach to the threshold and then run the FPM down the runway you will do well. Just remember to pull back on the throttle during those final seconds and let the aircraft settle to the runway.
FLAMEOUT LANDINGS
Flameout landings really aren't that difficult. This section of the tutorial will try to teach you some basics in learning how to do them successfully. The first thing you should do when a flameout occurs is to jettison your stores. Jettison all of it as soon as you can. One thing that makes this type of landing different from the normal type of landing is that you will want your glideslope angle to be 11-12 degrees as opposed to 2.5-3 and your AOA to be 6 degrees instead of 11.
The high glideslope and low AOA are necessary to get you to the runway without losing all your energy and crashing short of the field. This first image shows me intercepting the glideslope. I have placed the FPM on the front of the runway. Do not lower your gear or open your speedbrake yet! it is much better intercepting the glideslope at 11-12 degrees.
Two important conditions have now been met in the above image:
1. We are now on the 11 degree glideslope (the FPM is just below the 10 degree pitch ladder line).
2. The FPM has been placed on the front of the runway. Now we need to do a third thing. We need to get our AOA to 6 degrees. For our regular landings we were able to get to our 11 degree AOA by using the AOA bracket. For our flameout landing we will not have an AOA bracket to work with since we have not lowered our gear. We do not need the bracket though. We can visually tell what AOA we are at by looking at the difference between the FPM and the gun cross. The image above shows us at about 4 degrees AOA. You will notice that the distance between the FPM and the gun cross is only 4/5 the distance from the 5 and 10 degree pitch ladder lines.
So if our AOA is low, how do we increase it? We need to decrease or speed. We can do this by opening up the speedbrake. We simply need to open it until we reach 6 degrees. At that point we can close them again. If the AOA is too high then we will need to make sure the speedbrakes are closed so that the AOA can decrease. You will notice that I have not talked about airspeed. As long as your stores have been jettisoned, you are on a glideslope of 11 degrees, and your AOA is at 6 degrees, you will be at 210 kts airspeed which is exactly where you want to be. I do occasionally take a glance at the airspeed but you generally will not need to. Like in the first section of the tutorial there is no airspeed showing in any of my screenshots. It isn't necessary to place too much of an emphasis on it.
This next image is the most important image in the flameout tutorial. It shows exactly what you should see for an approach that is at a proper 11 degree glideslope and an AOA of 6 degrees:
The next four images show solutions to various approach problems. This first image shows the FPM below the front of the runway. The solution is very simple. Pull back on the stick to get that FPM to the runway threshold.
This second image shows the FPM too high. Push forward on the stick.
This next image shows the AOA too high. We are going too slow. If our brake is open we will need to close it to get our speed back up and our AOA lowered. This image shows our AOA at about 7 degrees. Remember that we want 6 degrees.
This final image shows the reverse situation. Our AOA is too low because our speed is too high. Open your speed brake. This will create drag slowing you down and raising the AOA.
You will notice that the big difference between a flameout landing and a regular landing is that we use the throttle to control our AOA in a regular landing and the brake to control our AOA in a flameout landing. Anyway, on with the tutorial: Usually, once 2000 feet from the ground, make sure brake is closed and then lower gear. This next image shows just before lowering the gear. At this point still doing everything right for a proper landing (11-12 degree glideslope and 5-6 degree AOA).
At about 500-300 feet (the altitude in the image above) we will start flaring. Now you may be wondering why we are starting to flare 500 feet above the ground. With our normal landing we flared about 100 feet above the ground.
FPM will usually float near the end of the runway for about 3-5 seconds before touchdown. Sometimes, if my AOA seems low (about 6 degrees) place the FPM on the horizon and float a few feet above the ground for a few seconds allowing AOA to increase. The final image actually shows touchdown. AOA is near 10 degrees. Do not worry too much if your AOA is a little lower. You will also notice that you will land further down the runway than usual. This is normal for a flameout landing. Don't go too far though if you can help it.
Upon touchdown you will want to extend the speed brake to help slow you down. Increase your AOA above 10 degrees to help aerobrake you. That's it.
Here is a recap of flameout landing procedure:
1. Jettison your stores!
2. Intercept the 11-17 degree glideslope.
3. Keep the FPM on the front of the runway (stick) and your AOA at 6 degrees (brake). 4. At 2000 feet close your brake (if open) and lower your gear. Ignore the brake from now on and fly the FPM.
5. Start flaring between 500-300 feet AGL. The flare will be gradual and needs to be timed so that the FPM is at the end of the runway when just short of touchdown.
6. Upon touchdown aerobrake by holding your nose at 10+ degrees and open your speedbrake.
